John D. Anderson V:
Operations Improvement
Helping businesses and organizations identify waste, improve flow, and solve operational problems through observation and practical process improvement
About Me
Observe. Understand. Improve.My name is John D. Anderson V, an operations improvement professional focused on helping organizations solve practical problems through disciplined observation, systems thinking, and hands-on implementation.Every improvement begins the same way: I observe the work, seek to understand the objectives, identify the constraints, and follow the evidence before proposing solutions. Rather than relying on assumptions or best practices alone, I work to uncover the root causes behind operational challenges and develop improvements that are practical, measurable, and sustainable.With more than 13 years of experience in warehouse operations and leadership, I’ve led projects involving process redesign, warehouse layout optimization, workflow improvement, organization, and continuous improvement. I believe the best ideas should be tested in the real world, not just discussed in meetings. That’s why I don’t just identify problems—I build solutions, measure their impact, and document what worked, what didn’t, and why.This website is a collection of those experiences. Each case study follows the complete journey from observation to implementation, capturing not only the solution but the thinking behind it. My goal is to help organizations improve their operations while creating a resource that allows others to learn from real-world challenges and apply the same principles in their own environments.
Here you will find a list of case studies. In them you will find not only the solutions to various problems in various environments, but also the thinking processes used and lessons learned.
Warehouse Airflow

Before Tables Moved

Packing Area After Tables Moved
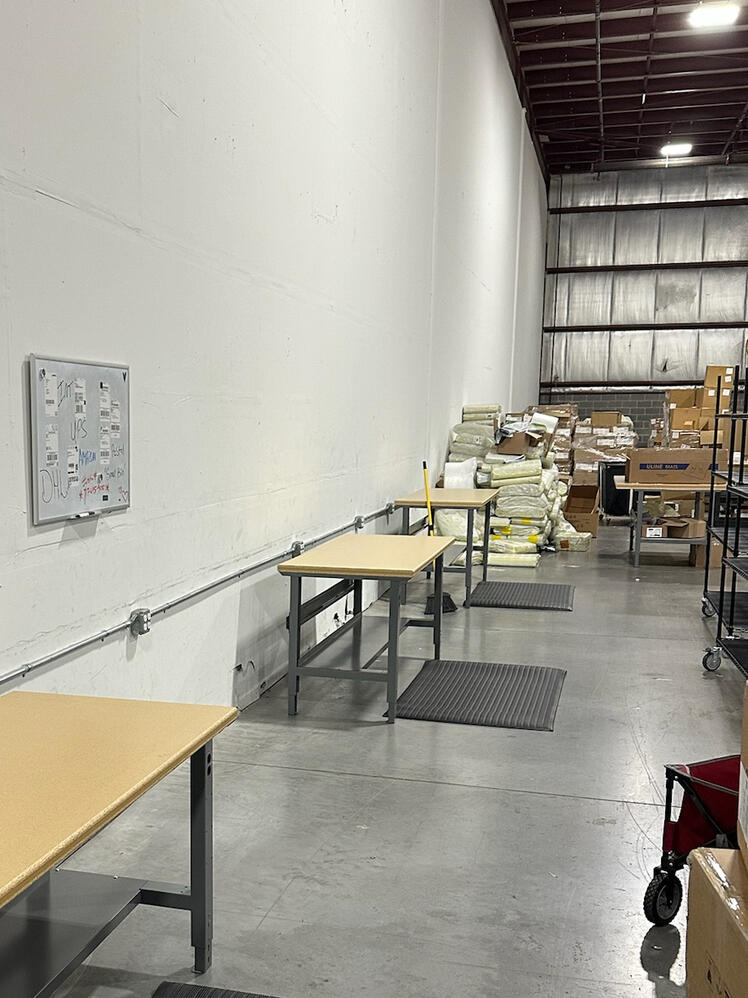
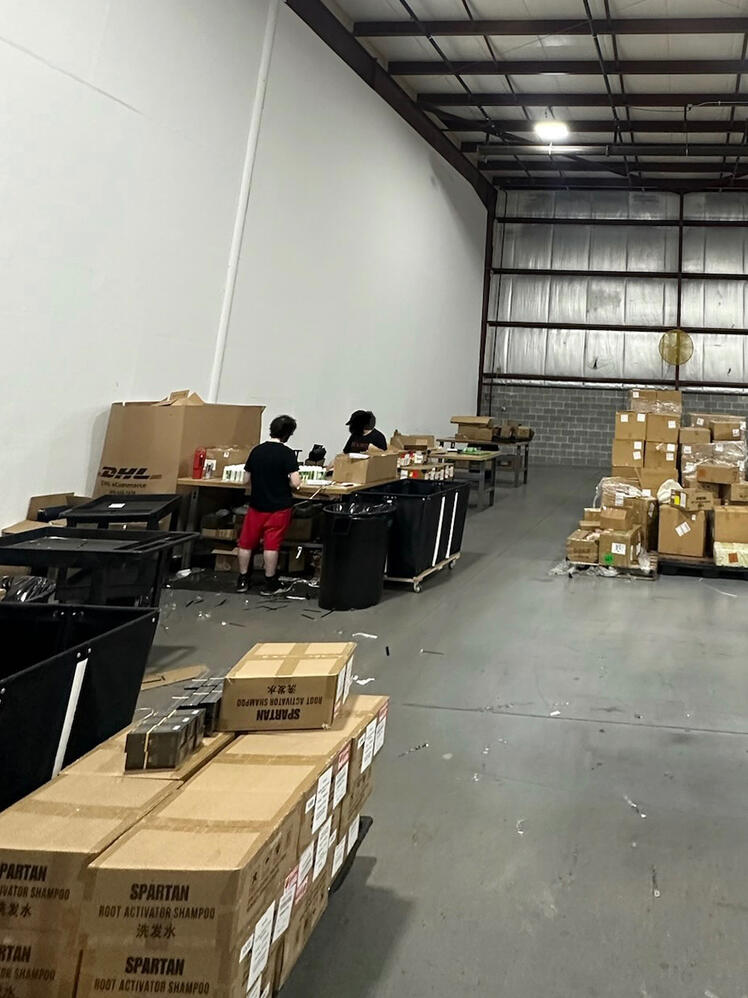
We had recently added a third row of tables to the packing floor. The electrical availability in the building is severely limited, and we had just also had an electrician come in and install about 25-30’of wire and conduit and added 6 4-way outlets. Two weeks later the weather warmed up outside and the third row of tables had no airflow. We wanted more fans but had no outlets. We came up with the idea of extending the first row of tables further back the wall, and then having the electrician come back to extend the line. We got the layout done and called him, and he quoted us for $11k. That seemed outrageous until I investigated if his claims for overload were true. The fans turned out to draw 7.9amps each moving very little CFMs. We couldn’t mount fans because of the building construction. I designed modular fan stands using lower amperage oscillating fans with a higher CFM rating.
Problem
There was extremely poor airflow in the third row of packing tables. The use of extension cords from existing outlets to add more fans would impose a tripping hazard. The new electrical installation was run from a subpanel, not the main and can only support so much electrical load, and the existing 42” fans draw 7.9 amps, there are 2 20-amp breakers on the line, and we already have 3 fans. New fans can’t be mounted because of the drywall partition in the subdivided warehouse. The layout also changes often and permanent installations tend to have major drawbacks later on in this environment. But what is the root issue? What are we really looking for? Airflow, not electricity.
Objectives
-Improve airflow therefore improving employee comfort
-The existing fans have a high amp draw with low CFM movement. New fans with a lower draw but higher CFM rating are preferred
-As in any business, keeping costs as low as possible is implied
-Avoiding a permanent installation will work in our favor later when the layout changes again as it often does
-If the system can be moved with the layout, that would be the most desirable
-Use what is affordable and available
Constraints
-Warehouse is leased and subdivided
-The partition walls are drywall with bare minimum structural support
-The previous electrical installation was not off of the main power supply but from a junction box in the break room. The installation was supported by the box, but any further installation would not
-Budget is limited to what can be justified
-Operations must remain live during construction
Options Considered
-Wall installation (very quickly pushed away in my head as an option looking at the flimsy drywall)
-Is there some kind of portable stand that we could mount a big enough fan on? Then we wouldn’t have to worry about installing anything, just plug them into what we already have, and if they oscillate they cool both areas equally
Selected Solution
I researched stands for fans and could not find anything close to what I imagined. I needed something about 6-10’ tall that could support a high-velocity, high CFM, oscillating fan. I thought about the heavy duty Unistrut that I handled at my previous employer, and I thought about making stands from that and the parts to join it together. I explained my idea to ChatGPT and asked it to sketch me a design (pictured below) I could take to our head of operations. I got a quote for the cost of materials and did the research needed to know how to cut and assemble the strut myself, and therefore included the cost of the tools needed to do the job. The created fan system included:
-3 24” HICFM oscillating wall fans
-Custom cut and bolted strut frames
-No welding required
-Triangular and X-bracing for support
-Sandbag ballast (filled with gravel rocks of same weight because they were cheaper and accomplish the same goal)
-Relocatable using available warehouse equipment
-Existing electrical supply utilized, no need for new
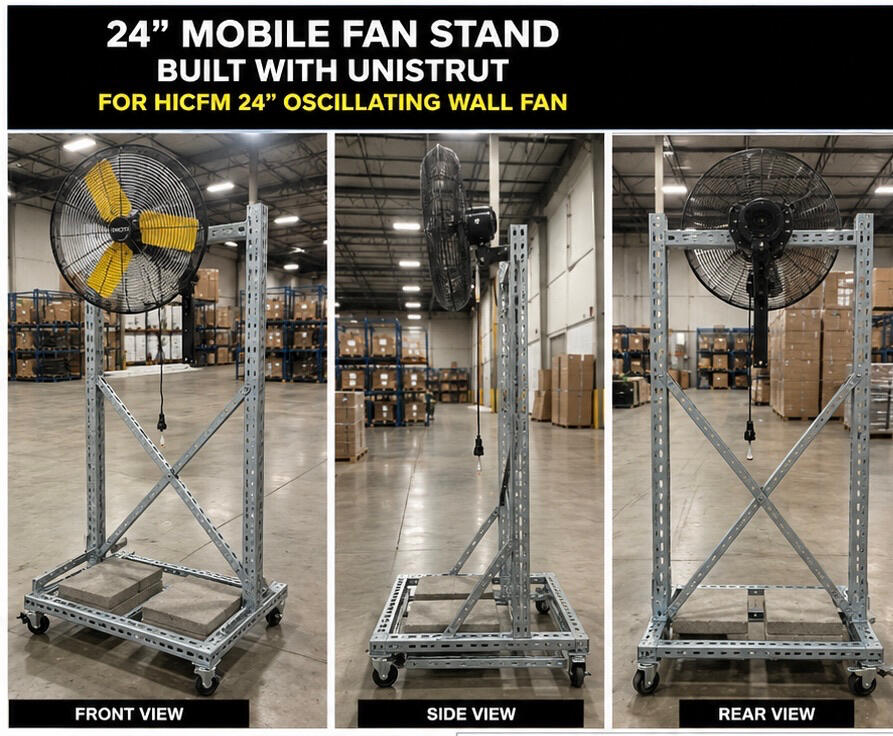
Design and Development
I went to Schaedler Yesco and, with the help of my old friend Mike Hillman, I looked through all of the available parts for connecting Unistrut. The design was fairly simple, two uprights connected to a square base with two braced across the top, and support on the back and bottom. After picking the parts, I looked up what was needed to cut and assemble Unistrut correctly and went to Harbor Freight for the tools.Version 1 took me about 7 hours across 2 days to complete. Because this project was developed internally, I handled responsibilities that would normally be split across several roles: design, sourcing, fabrication, project coordination, testing, troubleshooting, safety review, documentation, and continuous improvement.This was the first project I’ve ever had to do everything from scratch. I had to make the process repeatable because I needed 3 identical stands, and to be able to do this efficiently, I needed to design, record, test, redesign, assess safety/injury risk on edges especially, build, observe and troubleshoot, improve the design, record, document. And all of this during a live operation, save the 6 hours over the two days on the weekend I came in to cut and measure everything. To keep organization, I used a sharpie to write on each piece what it was going to be for so I didn’t have to sort through many like pieces to see which length was for what. I assembled the whole stand save the last cross beam for the fan mount support because I did not know how long the fan mount bracket was and needed it to measure where to drill the holes for the brace.Once the fans came, I realized that the fans were a little smaller and lighter than I’d imagined, so I cut the upright length down from 9’ to 8’ tall. Because of the way the base fit to the uprights, I cut the width of the base down by 1/2 inch. That fixed the appearance of the legs being farther apart at the bottom than the top. I documented the change to the baseVersion 2 needed modifications. Two pre-cut crossmembers were approximately two inches short. Rather than reorder material and delay the project, I redesigned the support using usable offcuts already on hand. I also reduced the height of the two packing-area stands by six inches to place airflow closer to employees.Version 3 was easy because I made the necessary adjustments from version 2 and the only thing left was assembly.Version 1 took about seven hours to finish, version 2 about two hours, version 3 about 45 minutes.
Build Process

ChatGPT generated a sketch with my instruction

Brainstorming the framing process

Attaching uprights to base

Fitting Cross Beams

Delivery of Materials

Repeating process, labeling parts

A couple of notes in my journal

Laying out other two stands to start fitting them togeether

Finishing distribution of components

How I organized my cart

All of the tools needed (excluding ladder)

Because why wouldn’t the fans need assembled?

First one done


Testing and Commissioning
Structural testing
- Push and stability checks passed. One stand wobbled, but loosening a bolt to let the base rest flat fixed that.
- No visible frame vibration, actually very suprisingly quiet for an industrial fan
- All three oscillation speeds tested
- Ballasts filled with gravel used to finalize stablilityAirflow testingAirflow was manually evaluated from multiple packing positions, both facing toward and away from the fans. Air movement was perceptible at every table tested from at least one fan.TroubleshootingOne fan developed an abnormal rubbing noise after commissioning. Comparing it directly with a correctly operating unit showed that the blade assembly sat farther back on the shaft, leaving less clearance from the rear shroud. I removed the guard, repositioned the blade assembly, and retested the fan. The noise was eliminated without replacement parts.
Results
- 3 operational, relocatable airflow units
- Improved airflow for employees
- Lower electrical demand than previous fans
- No permanent building modification
- No structural vibration
- Repeatable construction process
- Expensive electrical expansion avoided
Cost Comparison
| Option | Estimated Cost |
|---|---|
| Electrical expansion | $11,000 |
| New fans | $677 |
| Strut & Hardware | $1378 |
| Tools | $301 |
| Total Airflow System | $2356 |
| Cost of Labor | well I’m salary and live operation… |
| Estimated cost savings | $8644 |
| Approximate cost reduction 79% |
Lessons Learned
- Reverify dimensions after every design revision.
- Prototype mounting interfaces before batch-cutting material
-Design repeated assemblies to minimize adjustments during installation.
- Assemble complex brace sections at ground level when possible.
- Purchase modest surplus on low-cost consumables to prevent work stoppages.
- You can either buy a few extra parts once, or take three separate trips to Home Depot and reconsider your life choices
Business Impact
- Improved employee comfort in previously underserved packing area.
- Added airflow without increasing permanent electrical infrastructure.
- Preserved flexibility for future layout changes.
- Reduced dependence on high-amperage floor fans.
- Created a repeatable internal build method.
- Avoided downtime associated with permanent construction.
Transferable Principle
Design around the building, workforce, electrical capacity, and operating environment instead of forcing the operation to accommodate a standard product.
Final Project Summary
What appeared to be a costly electrical limitation was converted into a lower-demand, modular airflow system built using standard materials. The final solution improved employee comfort, avoided permanent modifications, remained compatible with warehouse operations and layout, and created a repeatable system that could be adapted for other leased 3PL facilities